Introduction
X-Change Life™ is written in Harlowe, a Twine “Story Format”. Twinery is no longer used for development, the project has been fully decompiled using Tweego, into human-readable text files (thanks to the patient efforts of togashikokujin). These text files use the .twee file format and are readable using a text editor.
This method of doing things also allows user-created content to be created for the game, using the mod loader.
Tools
The first step to doing anything behind the scenes is to be able to read those files. You may use whichever text editor you prefer, but it is highly recommended to use Visual Studio Code (commonly referred to as VS Code, or VSC) You can download and install VS Code (from https://code.visualstudio.com). Once installed, you should also download and install the twee 3 language tools extension from the extensions tab (in the left panel.)
Game Repository
When you go to play the game, you are running a compiled HTML file. If you go to try to open that compiled file, you will be overwhelmed with terrible formatting and an endless wall of text. The core game files themselves are actually separated out and organized neatly into sections. We look at these smaller, more digestible files, when we want to reference the game code. You can view the game’s files on the gitgut repository.
There is a search feature, where you search for files or the code inside of the files, to be able to find certain things. This is a nice way to quickly spot check information in a pinch, but the best way to work with these files is to clone into the repository and download a local copy of all these files onto your computer. By doing so, you’ll be able to perform global searches inside of VS Code, which makes references these files and the code inside much easier than having to visit a website and search around.
You can clone the repo manually through command line (instructions here) or you can use repository management software (such as GitHub desktop) to do it for you.
Opening Game Files
I highly recommend setting up a workspace in VS Code specifically for XCL. When you do, you can select to add a folder to that workspace. Go ahead and add the game’s repository to the workspace. When you clone into it, you will have specified a location to put those downloaded files. This will be the folder that gets added. You can add additional folders as you develop your mod(s).
Now that you have your workspace and your folder, go ahead and open one of the files so we can start to understand how the game is constructed.
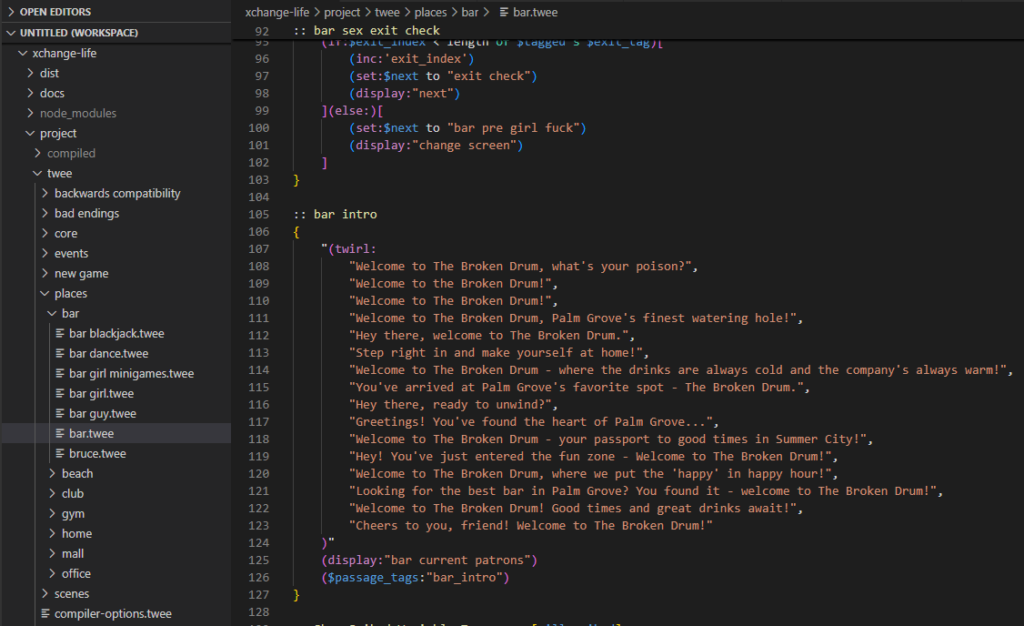
Your window should look something like this. If the text colors are off, then you need to find the Language Mode at the bottom right of your screen and switch it from “twee3” to “twee3-harlowe-3”.
If you look at the code you will see that it is divided into chunks called passages that all start with “:: “.
You can learn more about Harlowe (and I really encourage you to do so) by visiting: https://twine2.neocities.org/
The :: bar intro passage is pretty simple in terms of what is happening.
Twirl is a custom macro created for use in the game, it closely mimics what (either:) does, essentially it picks a random entry from the provided entries. So ONE of those lines will be displayed when bar intro is called. That is the first part of this passage.
The next is (display:”bar current patrons”). Display is a macro native to Harlowe, it essentially tries to write out the contents of the provided passage string. You can think of it like calling a function, in other languages like python. So this step would essentially just run the “bar current patrons” passage, which you could go look up if you wanted to continue down the path of figuring out what does what.
The last portion of this passage is a passage_tag. This is a little more of an advanced concept, but essentially what a passage_tag does is allow for inserting INTO this passage at that location, when the passage_tag is used. (Don’t worry if that doesn’t make sense, more on this later).
What can mods do?
At the most basic, a mod changes what happens when a passage is run. If it adds new passages to run, those passages have to be somehow called, usually by modifying an existing passage. You can have very simple mods that change something minimal, very complex mods that change entire aspects of the game, or anywhere in between.
How to get started?
One of the best ways to get started is to look at an existing mod and walk through it to see what it does. Between looking at mods and looking at the base game, some things should start to click for you. A good first attempt at a mod could be something in the game that you wish would happen differently, or something you’d like to change.
Altering Game Passages
There are three ways to alter a game passage with a mod. Some are more appropriate than others.
- Advising a passage (recommended) 😊
- Using passage tags (if available and fits your criteria) 👍
- Overwriting a passage (should only use when absolutely necessary) 😭
Advising a passage (using around)
The mod loader contains a feature for mods: Aspect-oriented programming (AOP). If you are a programmer you may already be familiar with this. The basic idea is that a mod can define advice that “modifies” a passage that already exists in the game, without having to overwrite that passage. Say for example the game contains the following passage:
<!-- Base game -->
:: chicken
Why did the chicken cross the road?
Now we want to create a mod to add the answer. Previously, we would have to copy the entire passage, which overwrites it:
<!-- old-mod.twee -->
:: chicken
Why did the chicken cross the road?
To get to the other side!
This has two problems: It can be annoying to update when a new game version releases, and it can lead to conflicts with other mods that modify the same passage. Instead, we can define an around advice (the only type of advice supported at the moment) to modify the passage:
<!-- new-mod.twee -->
:: chicken [around]
(display:_around)
To get to the other side!
With the mod loaded, when the “chicken” passage is displayed, it’s the modded passage that is displayed. The mod passage then in turn uses (display:_around) to display the original passage, before adding its own text. In effect, the mod has “modified” the original passage and appended its own text.
(display:_around) can be used in more complex scenarios too. For example, a mod could only show the original passage conditionally:
:: chicken [around]
(if:$animal is "chicken")[(display:_around)]
(else:)[Why did the $animal cross the road?]
When applying advice, the mod loader will produce the following code internally from the base game and new-mod.twee samples given above:
:: chicken-answer
Why did the chicken cross the road?

:: chicken
(set:_around to "chicken-answer")
(display:_around)
To get to the other side!
Multiple mods can apply advice to the same passage without issue. (display:_around) in one mod’s advice will display the advice of the second mod, and the second advice’s (display:_around) will then call the original passage.
Modders can use this technique to modify some passages less intrusively, without copying. This should make it easier to update mods to new versions of the base game, and can improve compatibility between mods.
Passage Tags
Passage tags are listed and explained here:
Among other things, passage tags are a way to handle mods being in conflict with each other.
Instead of needing to overwrite the original game passages to change things at certain points, the game itself checks to see if it should do something else when it encounters these $passage_tags.
Modders can use these $passage_tags to insert new pieces of code into the original passage at the point that these tags are referenced.
If you refer to the image from earlier, it had ($passage_tags:"bar_intro") at the bottom of the passage. This means we could create a passage and tag it with [bar_intro] after the name and have our code inserted at this specific point in the original passage.
The game looks for these tags when it encounters that call, if it finds one then it inserts the code from that tag and proceeds with the rest of that passage.
You would tag your passage like this:
:: my bar intro [bar_intro] As the bartender speaks, a glass shatters in the backroom
This would insert that line after the bartender’s introduction.
Refer to the passage tags file for a full list and much better explanation of what each tag does.
Overwriting Passages
If it can be avoided at all, overwriting passages should be considered a last resort. This is the fastest way to cause a mod conflict.
A conflict occurs when more than one mod tries to change the same passage. So, for example, if your mod and somebody elses both overwrite the bar_intro passage then the two mods would be in conflict.
A basic first mod example
Let’s try to make a mod with passage tags.
One of the things that you might want to be able to do at the bar would be speak to the bartender. This would mean that we want to add an option to the bar options passage. There is a passage tag there already so we can make a mod that won’t conflict with any others.
So the first thing to do would be to create a new file. Call it BartenderMod.twee
Then we can start making the mod. First we need a name for the passage.
Let’s call it
:: bartender chat
Remember all passages start with “:: “
Next, because we want it to go in as a bar option we need to attach the bar options passage tag. This tells the game to look at this passage when it reaches the part of the game where it gets to the bar options passage. So far the game will look at the passage but it’s empty so it won’t do anything. What we want is for it to do something.
We will type in:
:: bartender chat [bar_options](link:"Chat with the bartender")[($cs:"bartender chat 2")]Now we are telling the game to do something when it looks about for passage tags and sees our tagged passage. We have told the computer to make and display a “link” (a link is a clickable button) and to call it “Chat with the bartender”. The $cs macro (short for “change screen”) means that screen will be changed to display whatever is in quotes, in this case it is the “bartender chat 2” passage.
We don’t yet have a “bartender chat 2” passage so we need to make one now. Type in:
:: bartender chat 2
You chat inconsequentially with the bartender until he has to go and attend to other customers.
Now that our passage was displayed, we need to get back to the main game somehow. So add this:
(link:"Finish")[($cs: to "bar options")]
And that is your first mod complete. It should look like this:
:: bartender chat [bar_options](link:"Chat with the bartender")[($cs:"bartender chat 2")]
:: bartender chat 2
You chat inconsequentially with the bartender until he has to go and attend to other customers.
(link:"Finish")[($cs: "Hit the bar")]
Now we want to add the mod to the game. Open the mod loader and click “Add Mods”. Browse to where you created the BartenderMod.twee file and select it. Now click “Load Mods.”
Now you can play the modded game and test your mod. Head over to the bar and see if your new bar option appears!
Screen Management
It should be noted that there are several methods of changing the screen, you may hear referred to as “change screen” or “next”, and a few others. Ultimately the methods you choose depend on your scenario.
In order to understand what method you need, you have to understand how the screen is laid out.
Certain areas of the screen are commonly defined and redefined using Hook names. There are actually a lot of them, but let’s focus on just a few to begin with.
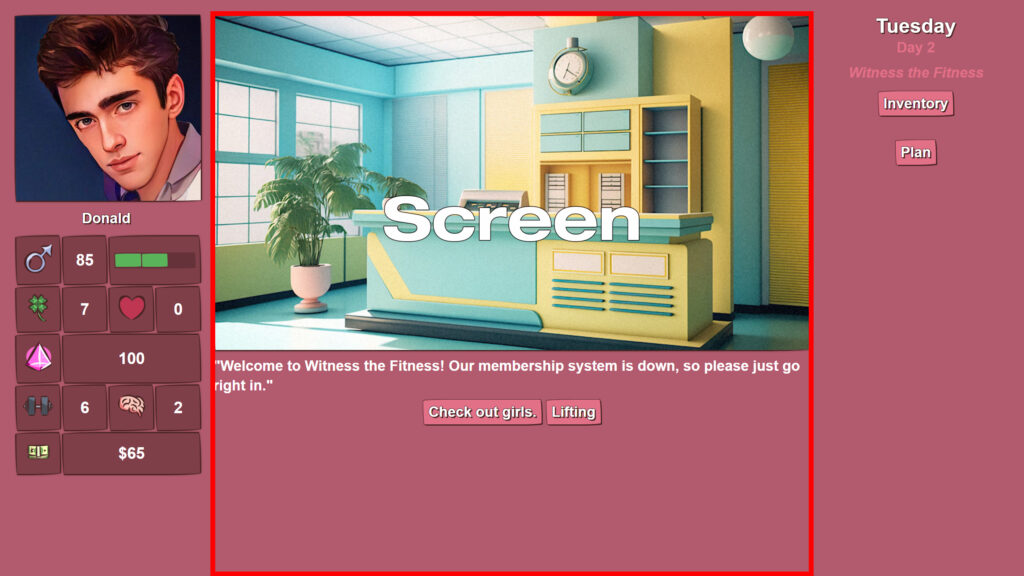
The hook referred to as “Screen” means the center column, where the majority of the story takes place.
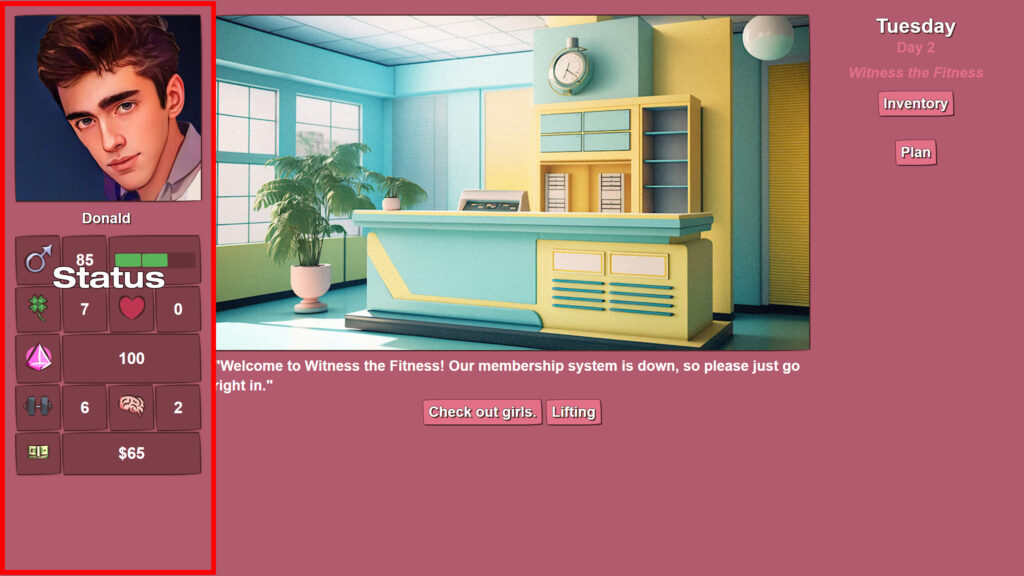
“Status” refers to the left column, which houses your character’s portrait and stats.
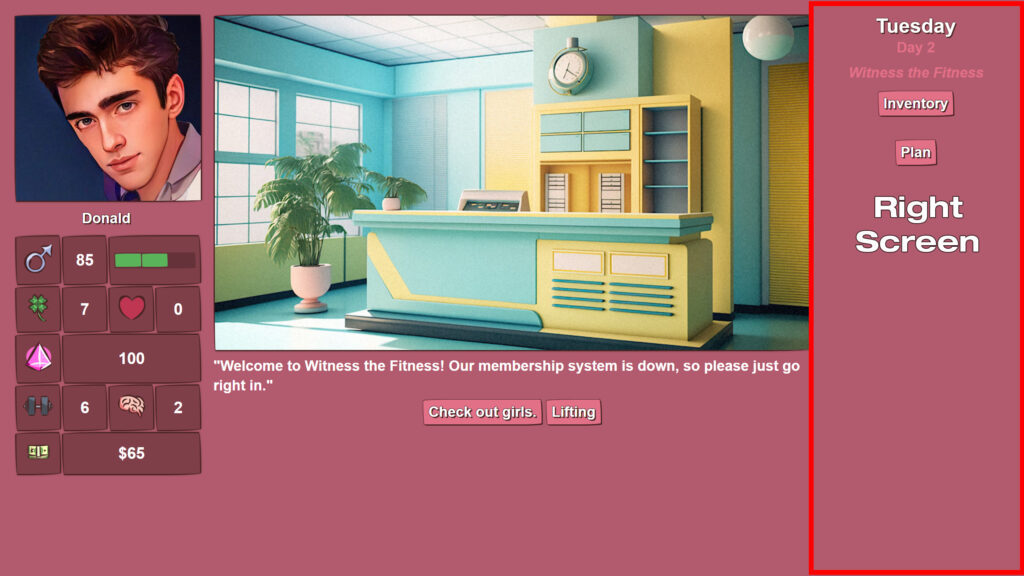
“Right Screen” refers to the right column, which serves multiple purposes, such as showing your location, date, inventory, day planner, outfit portrait, and can show NPC portraits and info.
There are other hook names inside these, but these are three main areas. It’s important to know this, because the method of changing screens impacts these areas, and you may end up with blank screens if you use the wrong method.
Change Screen
The change screen method ($cs) only replaces the center column, while leaving the other two intact. It exists in the code base in several different ways.
There is a passage called :: change screen , which was the original method of doing this. You would set $next to the passage name that you wanted to display, then you would display change screen.
It looked like this:
(set:$next to "passage name")(display:"change screen")A macro was later created to shorten this, it should now be used like this:
($cs:"passage name")This differs from simply using (display:”passage name”), which would only run the code in that passage, without replacing any screen portions.
Next
The next method ($nx) replaces the entire screen, all three columns.
<!-- Original Method -->
(set:$next to "passage name")(display:"next")

<!-- New Macro Method (use this one) -->
($nx:"passage name")
This is normally used when changing locations. Location intro passages are typically “fullscreen” and will set up all three columns, so you call them with $nx to clear out anything already there.
Simple Option
$simple_option is a macro that was created to help with scenes. It’s designed to offer you three methods of changing the screen, while providing a simple $choice variable that corresponds with what button the player clicked on.
($simple_option:"passage name","choice 1","choice 2","choice 3")
<!-- You can use any number of choices if you want (including only 1) -->
The default method it uses to change the screen is the Change Screen method. Alternatively, if you include the word “display” or the word “next” (in all lowercase) you can instead force the macro to use (display:”passage name”) or ($nx:”passage name”), for display or next.
<!-- a display example -->
($simple_option:"buy more pills","display","buy 5","buy 10")

<!-- a next example -->
($simple_option:"Go home and watch porn","next","Run home and watch porn","Call a cab")
Using Hook Names
Hook names are generally set up like this:
[(display:"character status")]<status|
<div id='scrollable-content'  class='center_screen' data-simplebar>[
    []<image|
    []<text|
    <div class="options">[]<options|</div>
]<screen|</div>
<div class='top_right' data-simplebar>[(display:"location and time")]<right_screen|</div>
You’ll often see the (replace:) macro used in conjunction with the hook name, in order to replace certain parts of the screen. Such as:
(replace:?text)[Some text here]This gets used a lot to change options, text, images, any named hook can be changed with this method. This is why sometimes you might see links (buttons) that will replace certain parts of the screen, but not change the entire screen.
Other Helpful Tips
Look at existing code or mods – they will give you an idea of what can be done and how to do it.
If you are looking at mods you may come across the .xcl file type. As noted above, .xcl files are re-named .zip files. These are used to try to make using the mod loader easier. The mod loader uses zipped up .zip files. A lot of people were unzipping the zip files and then the mod loader was not loading those mods properly. To prevent this there is now the option to re-name .zip files as .xcl files so that they can be used by the mod loader but people (hopefully) won’t unzip them. If you want to look at a mod in .xcl format you can just unzip it using any zip utility (because it’s actually just a .zip file with a different name). If you are having problems it may help to rename the file .zip instead of .xcl
If you are trying to do anything with audio it is a good idea to check the game settings in relation to audio – there are three settings – if you limit what the game plays then it will be very difficult to test your mod. I would recommend choosing the play all sounds option, at least when testing your mod.
In relation to audio, the $sex_loop variable will usually re-set to “0” when the passage changes. If you want it to continue in the next passage then you can set the variable $sex_loop_continue to “true”. If you are doing this, remember that you will need to stop the $sex_loop at some point.
It is important to realize that passage tags can be used in a range of circumstances for a number of different effects. Before changing parts of the base game you should look at the list of passage tags and see if you can use one of them.
When playing the game use the ` key to open up a special window – you can use it to set variables and check their values. This can be useful if you want to see how the game works in particular parts or ensure that your mod is working the way that it should be. Also, when playing the game use the 1 key to open up debug mode.
When looking at the code you will see a lot of (text)[text]. The bit in the () is called a macro and the bit in the [] is called a hook. It may be helpful to think of them as (condition)[action]
{} are special brackets to do with collapsing extra spaces (“whitespace”). They improve code readability without sacrificing in-game screen space
Similarly, Harlowe does not require the same sort of line and spacing discipline that features in other programming languages, for example, RenPy.
Searching the discord channel can sometimes provide answers.
At the moment undefined variables default to “0”. So this means if you tell the game to check $apples and you haven’t already told it what value $apples is the game will use the value “0”.
When you make a mod (beyond what is in this guide) we would appreciate if you shared it. There is a mod releases channel on the Discord where people typically announce their mods – though access to that channel is restricted so you will need to ask someone for permission to post there. Almost all mods are now hosted on Lovers Lab (https://www.loverslab.com/ specifically https://www.loverslab.com/files/category/319-x-change-life/). After announcing your mod I would suggest that you go there to upload your mod.
Finally, if there is anything that you think is missing from this guide or that you found useful or helpful that is not mentioned please let us know so we can improve this guide (messaging us on Discord is probably best).
Metadata
By default mods are loaded in alphabetical order and if they overwrite the same passage the mod loader displays a message indicating that fact. You can use metadata in mods to control their interactions with each other.
Information about metadata can be found here:
https://gitgud.io/xchange-life/mod-loader/-/blob/main/metadata_info.md
Helpful guides to help get started modding
Be sure to check out the other articles for modding for more information how getting started.
https://x-change.life/wiki/docs-category/mods/
Audio
The game uses the mp3 format, exclusively.
Aphrodite created a custom audio system, which I know nothing about (sorry)
The game used to uses the Harlowe Audio Library. Information about that can be found here:
https://twinelab.net/harlowe-audio/#/
Useful Links
Harlowe Manual (Refer to the manual!)
Unofficial Modding Tools – Currently for Bar Girls, Player Characters, & Metadata.
Special thanks to previous contributors of this article and everybody that helps out in the #mod-chat discord channel